 Our Photovoltaic Expansion 1 Our Photovoltaic Expansion 1
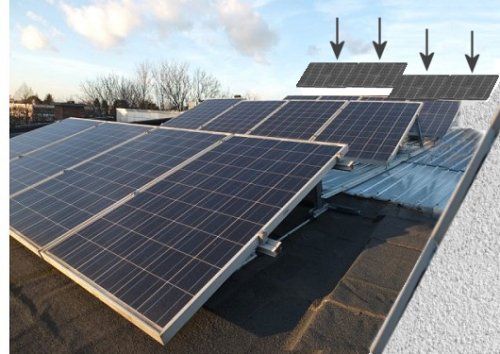
We have added the new solar panels to the image above as a drawing and marked them with arrows. They look much smaller here than the existing ones, but in reality they are significantly larger. My son was
already skeptical about whether we'd be able to get them onto the roof.
It worked out, and the system will be put into operation for the first time tomorrow. Why not today? Because I ran into a problem with assembling the adapters right at the very end and had to
watch another tutorial on YouTube.
It all looks so easy, but it actually took a while—partly because of the metal roof, which gets so hot in this weather. Added to that was the exorbitant cost of installing the new panels. Originally, they were supposed to
join the ranks of the old ones.
Mathematically speaking, it would have fitted, but the structure would have been much more prominent on the right side, and we were worried that our neighbor on the left might have objections. The current one would
probably not mind.
He's not interested in solar panels.s However, if the situation next door changes and a new owner complains about the shade because the neighboring house is lower, then we’re in for some trouble that we’d really rather
avoid.
So the only option left was to install it on top. However, the half of the roof shown here doesn't end far beyond the top row of the existing collectors; it then has a wall about waist-high before it slopes down again at the same
angle on the other side toward the north.
This means that the top two on the right are already hanging in the air by their upper halves, and the top two on the left are hanging almost entirely in the air. If I were standing next to one of the two left arrows, their upper
edge would reach all the way to my nipples.
| The gap is there to prevent a key hallway window from being shadowed. |
As you can imagine, with such a vast exposed area facing north, security measures require special attention. We had to significantly expand the framing intended for flat roofs.
During the connection to the existing system, certain shortcomings were also discovered that had to be corrected. But the connections between the old and new collectors, and between the new ones themselves,
have provided a great deal of additional stability.
There are also plans to line the tar-coated surface of the front roof beneath the collectors with aluminum foil so that their bifacial effect can be even more effective. Due to the weather and
safety measures, the work has been delayed.
It's a long way up to the roof via two ladders. Both must be set up beforehand and taken down afterward, no matter how briefly you worked. And the power cord that goes up there also needs to be
stowed away regularly.
You don't realize you've forgotten a tool until you've settled in comfortably up there to work. It was particularly common to have to go down and back up again when the cable routing through the chimney had to be checked.
What weight is suitable for getting past the existing cable harnesses, all of which also end prematurely? How do you secure the cables to the back of the collectors so they don't lie around unsightly on the roof?
Where should the box containing the summary of the four negative wires go? How is their waterproofing guaranteed? Will the 8 meters be enough for the five remaining cables going down? Yes, they were more than
enough, and tomorrow we'll see how effective they are.
| However, someone across the street was kind enough to play the piano very skillfully for about
an hour at a time. |
|